If you’re serious about growing your blog, creating an editorial calendar is a must! Here’s a step-by-step guide to creating a blog editorial calendar.

This year has been what I’d consider my first “serious blogging year.” After four years of writing blog posts every now and then whenever I thought of an interesting topic, I finally set some actionable goals for myself. At the top of my goal list was to publish two blog posts per week. I’ll admit, I was a bit nervous about this goal. I knew it’d be challenging to commit to two posts per week, but certainly not impossible as long as I planned my days accordingly and got into the rhythm of scheduling posts in advance so I wasn’t scrambling at the last minute to get posts published (which is what I did for my first four years of blogging).
No, it wasn’t the actual writing and scheduling of the posts that made me nervous. It was the ideation process that made my stomach turn. Two posts per week add up to 104 blogs posts for the year. When I set this goal for myself, I had maybe 10 workable blog post ideas up my sleeve, so writing 104 blog posts seemed like an impossible task at the time. But, if you scroll through Tall Girl Big World’s archives, you’ll see that I’ve managed to publish two posts per week since the start of the year. How did I manage this? I created an editorial for my blog so I could create and schedule my content weeks in advance.
Creating an editorial calendar has completely changed the way I blog. Gone are the days of throwing posts together at the last minute and wracking my brain for new ideas. Now, I’m able to plan my blog posts in advance and can work on them over the course of days or weeks instead of slapping something together in one sitting (which is always stressful and makes for less than superb content).
If you’re serious about growing your blog, you need to make an editorial calendar. Below are step-by-step instructions for creating a blog editorial calendar. You’re welcome to deviate from my instructions as you see fit. Ultimately, this is your editorial calendar, so set it up in whatever way works best for you. These are just the things that have worked well for me!
What is an Editorial Calendar?

Before I jump into how to create an editorial calendar, I wanted to make sure we’re on the same page about what an editorial calendar even is. At the most basic level, an editorial calendar outlines your content schedule. It lists your upcoming content and the date it’s to be published, and can also include things like: the social media channels you’re to share your content on and when, the SEO keywords for each piece of content, and so on. Blog editorial calendars are easy to customize based on your personal workflow and needs. Note that editorial calendars can be made for any type of content — social media posts, blog posts, email newsletters and campaigns, and more.
Now that we’ve covered the basics, let’s get stuck into how to create an editorial calendar.
Step 1: Choose You Primary Content Buckets
Before creating your editorial calendar, you’ll want to set aside time to ideate content for your blog. I highly recommend creating content buckets first. Content buckets are the broad topics you want to create more niche content for. In my case, some of my main content buckets are solo travel, travel tips, and NYC (although now I’m focusing more on life in Germany since I no longer live in New York). Having content buckets helps you create a lot of niche content about one particular subject, which in turn will help your blog posts rank better on Google and will help you build trust among your readers.
Think of it this way: who’s blog post on the best things to do in NYC would you trust more? Someone who’s lived in New York for three years and has written 20+ blog posts about NYC, or someone who’s written just a handful of posts about New York and was only there for a week? The more unique content you write about a certain subject (or content bucket), the more your readers will trust your advice and return to your blog.
I should also mention that having clear content buckets will help you better define your target audience. When you first start blogging, I don’t think it’s necessary to have a clear cut audience in mind — just writing good-quality posts is the most important thing. But as time goes on, you need to have a target audience in mind so that 1) you can write blog posts they actually want to read, and 2) when you begin working with brands you can tell them exactly who reads your blog and why that brand is a good fit for your audience.
Step 2: Brainstorm Ideas to Fit Under Each Content Bucket
Once you’ve created your content buckets and know exactly what topics you want to write about, you need to jot down a solid 10 to 20 ideas for each content bucket (remember: the goal is to plan things in advance, so you’ll need a lot of ideas!). If you can’t think of this many blog post ideas in one sitting, don’t sweat it. Ideation is that toughest part of blogging for me, which is why I set aside time to brainstorm new blog posts a few days each month. Doing it all at once only stresses me out, but dedicating 30 minutes per week to this task has worked well for me.
If you’re really struggling to think of blog post ideas for a certain content bucket, it may be a sign that that’s a topic you’re not very passionate about. When I began Tall Girl Big World, I wrote a lot of blog posts that I wasn’t super passionate about simply because I thought it’s what I should have been writing. Once I took a step back and started writing about topics that actually mattered to me and that I wished more travel bloggers wrote about, ideating new blog posts ideas became much easier.
Read more: 10+ Travel Blog Posts You Can Write About One Trip
Step 3: Commit to a Posting Schedule
This is one of the toughest parts of creating a blog editorial calendar, in my opinion. On the one hand, you need to be realistic about the number of posts you’ll be able to write per month. Setting an unobtainable goal will only lead to stress and failure in the long run. But on the other hand, I do think your monthly publishing goal should be a little challenging. If you don’t push yourself at all, you won’t experience the personal or professional growth you’re after. For me, two blog posts per week has been extremely challenging at certain times (i.e. when I moved countries. That was a tough month). I’ll likely continue publishing two posts per week in the new year since there’s no way I could churn out more than that, what with my freelance work and life in general on top of my blog.
In addition to committing to a set number of blog posts per month, you should also choose which days per week you’ll be publishing your posts. I publish every Sunday and Wednesday, and that’s been a good rhythm for my readers and I. If you have Google Analytics set up for your blog, take a deep dive into your blog’s data to see when visitors come to your site more often. You want to have new content up on your busiest traffic days so that if readers decide to bop around your site they’ll see that you publish blog posts consistently.
Step 4: Create Your Editorial Calendar
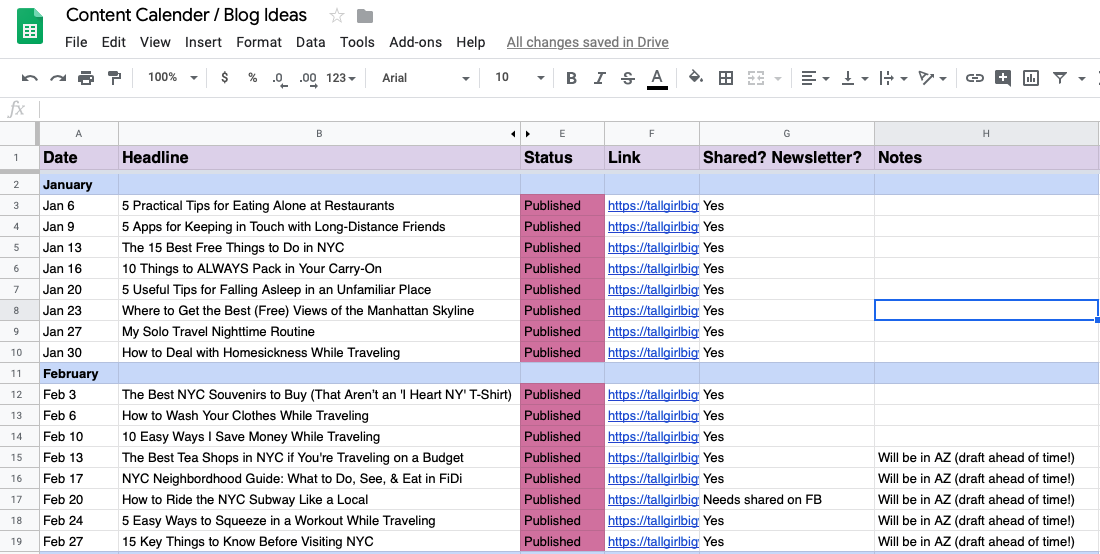
Now that you’ve done all of the above, you’re finally ready to create your blog editorial calendar! The actual setup of your blog is up to you, but here’s what I like to include on mine: the publish date, the blog post title, the SEO keywords (which I’ve hidden in the screenshot above), the status of each post, the URL (once published), and a column that notes whether or not I shared the blog post on social media and in my email newsletter. For the status of each blog post, I have a color code that I use so that with a quick glance I can see which posts I haven’t started, which have been scheduled, etc.
There are so many tools online you can use to make an editorial calendar, but my personal favorite is Google Sheets. Google Sheets is free, super user-friendly, and I like that it’s connected to my email. If you’re not a Google Sheets fan, here are a few other tools you can use to create an editorial calendar:
- Trello
- Asana
- Google Calendar
- Various WordPress plugins (CoSchedule, Editorial Calendar, etc.)
Note that not all of the editorial calendars listed above are free.
Step 5: Conduct SEO Keyword Research
SEO keyword research isn’t a must for every editorial calendar, but I wanted to mention it since focusing on SEO has seriously upped my blogging game. SEO stands for search engine optimization, and the reason you want to research SEO keywords is so that your blog posts rank well on Google (the better your blog posts rank, the more page views you’ll get). Once I’ve planned out my editorial calendar, I like to immediately do the SEO keyword research for each blog post and pop the keywords into my calendar. This way, when it comes time to write each blog post I have all the information I could possibly need at my fingertips and can start writing whenever I want.
In my experience, doing SEO keyword research at the last minute is never a good idea. Keyword research can take quite a bit of time, especially when you first start out. I like to do my keyword research month by month. As my monthly page views increase, I’m able to target more and more popular SEO keywords. By doing my keyword research in bulk, I’m able to take a pulse on how my blog is doing and can then choose keywords I can realistically compete for.
Tip: If you’re new to SEO keyword research and have no clue where to begin, I highly recommend the Make Traffic Happen e-books. They’re affordable and are a great resource for bloggers who are new to the world of SEO.
Step 6: Continually Update Your Editorial Calendar
Arguably the most important step in the editorial calendar creation process is to actually use the calendar you created! An editorial calendar is a living document that you should be updating weekly. Whether you’re linking to blog posts once they’ve been published, adding ideas to your content buckets, updating the status of posts in the works, or plugging in SEO keywords as you find them, you should be continually updating and adding to your blog’s editorial calendar. I prefer updating my editorial calendar en masse once a week, but find a schedule that works best for you and stick to it. Consistently updating your editorial calendar will make blogging easier overall and will minimize your stress in the long run.
I know this blog post was a whopper, but I wanted to make sure I touched on every last little detail so you have all the info you need to create an editorial calendar. If you have any questions, please leave me a comment below! And if you already have an editorial calendar and do things differently than I do, I’d love to hear more about your process. I’m always looking for new ways to streamline my process and grow my blog, so your tips and tricks are much appreciated!
Tell me: What’s one way you’ve made blogging easier for yourself?


Leave A Reply!